Author Topic: My Bachbird Project.... FINALLY!!!  (Read 10901 times)

Johnbob

  • Full Member
  • ***
  • Posts: 177
    • View Profile
Re: My Bachbird Project.... FINALLY!!!
« Reply #15 on: July 24, 2011, 11:07:34 AM »
Quote
that bach looks familiar.
Haha,yes, this bass should look very familiar.
JohnK played a huge part in getting this bass to where it is today. Amazing work. More on his involvement later. But he definitely helped take it to another level. Thanks again John.

Johnbob

  • Full Member
  • ***
  • Posts: 177
    • View Profile
Re: My Bachbird Project.... FINALLY!!!
« Reply #16 on: July 24, 2011, 11:38:43 AM »
Here's a picture of the belly contour all mapped and ready to be carved out.


Had to route the body for the bridge pickup since I bought the one pickup model. My friend helped me with all the routing. Also had to drill another hole for the second volume knob. Some of the holes on the face of the bass are from the pickguard and bridge/tail piece but all the extra ones are from when I screwed the 1/4 boards on it to make it level in order to run it through the drum sander.


And the actual carving begins. I carved it out by hand using a rasp for most of it and eventually sanded it to get it nice and smooth.

chromium

  • Hero Member
  • *****
  • Posts: 2316
    • View Profile
Re: My Bachbird Project.... FINALLY!!!
« Reply #17 on: July 24, 2011, 10:19:58 PM »
I'm actually torn about getting the bird etched into the pickguard on mine. Usually I like the bird logo on Thunderbirds but I kind of like the way that this one doesn't have the bird logo. We'll see.

I think it'd look fine without it.

As an aside, if you do decide to get the logo engraving done, I came across an easy way to in-fill the pattern.  There's a product called Markal Lacquer-Stiks, and you can get them in various colors (including white).  Looks like a big crayon, and you color over the engraving and rub off the excess with a cloth.  It fills in the pattern flush with the surface, hardens/cures and doesn't require clear coat.  I've tried it on some equipment panels and it seems to hold up well...


http://www.amazon.com/gp/product/B002BY8HKS/ref=pd_lpo_k2_dp_sr_1?pf_rd_p=486539851&pf_rd_s=lpo-top-stripe-1&pf_rd_t=201&pf_rd_i=B002BXJ906&pf_rd_m=ATVPDKIKX0DER&pf_rd_r=130V84V2RTW7FH52GJ2H

Johnbob

  • Full Member
  • ***
  • Posts: 177
    • View Profile
Re: My Bachbird Project.... FINALLY!!!
« Reply #18 on: July 25, 2011, 11:04:53 AM »
Cool, thanks for tip. That looks like a great option and they are nice and cheap too. I was just going to use white acrylic paint. That's if I end up adding the bird.

chromium

  • Hero Member
  • *****
  • Posts: 2316
    • View Profile
Re: My Bachbird Project.... FINALLY!!!
« Reply #19 on: July 25, 2011, 11:44:54 AM »
Cool, thanks for tip. That looks like a great option and they are nice and cheap too. I was just going to use white acrylic paint. That's if I end up adding the bird.

Rob did that on a 'guard (IIRC), and it came out great.  There's a post about it here somewhere...

This is just another way to do it that I recently came across.

Basvarken

  • Global Moderator
  • *****
  • Posts: 6882
  • hobby luthier. gibson bass nerd
    • View Profile
    • www.enkoo.nl
Re: My Bachbird Project.... FINALLY!!!
« Reply #20 on: July 26, 2011, 03:43:40 AM »

Johnbob

  • Full Member
  • ***
  • Posts: 177
    • View Profile
Re: My Bachbird Project.... FINALLY!!!
« Reply #21 on: July 29, 2011, 12:45:22 AM »
Quote
Here's that old thread;
http://bassoutpost.com/index.php?topic=2556.msg56972#msg56972
Yeah, that's where I got the idea.

Johnbob

  • Full Member
  • ***
  • Posts: 177
    • View Profile
Re: My Bachbird Project.... FINALLY!!!
« Reply #22 on: July 29, 2011, 12:51:53 AM »
A few pics of the belly contour all carved out and sanded smooth. I must say I was a little scared to do the contour but I am very happy with the way it came out. Also note how nice the body cleaned up after some light sanding.


I rounded the edges of the contour too so the routing matched the rest of the body.

Basvarken

  • Global Moderator
  • *****
  • Posts: 6882
  • hobby luthier. gibson bass nerd
    • View Profile
    • www.enkoo.nl
Re: My Bachbird Project.... FINALLY!!!
« Reply #23 on: July 29, 2011, 03:47:29 AM »
Looking good!

Pilgrim

  • Hero Member
  • *****
  • Posts: 9979
    • View Profile
    • YouTube channel
Re: My Bachbird Project.... FINALLY!!!
« Reply #24 on: July 29, 2011, 06:06:57 AM »
Smooooooooooooooooth.
"A computer lets you make more mistakes faster than any other invention with the possible exceptions of handguns and tequila."

Dave W

  • Administrator
  • *****
  • Posts: 22246
  • Got time to breathe, got time for music
    • View Profile
Re: My Bachbird Project.... FINALLY!!!
« Reply #25 on: July 29, 2011, 06:57:09 AM »
Nice work. From the results, hard to believe you're a rookie at this.

Johnbob

  • Full Member
  • ***
  • Posts: 177
    • View Profile
Re: My Bachbird Project.... FINALLY!!!
« Reply #26 on: July 29, 2011, 11:58:09 AM »
Quote
Nice work. From the results, hard to believe you're a rookie at this.
Thanks but my next update will show some evidence of me being a rookie for sure. Ha ha. I screwed the neck up a bit when I was sanding it. It's not too bad though.

Johnbob

  • Full Member
  • ***
  • Posts: 177
    • View Profile
Re: My Bachbird Project.... FINALLY!!!
« Reply #27 on: July 29, 2011, 03:03:28 PM »
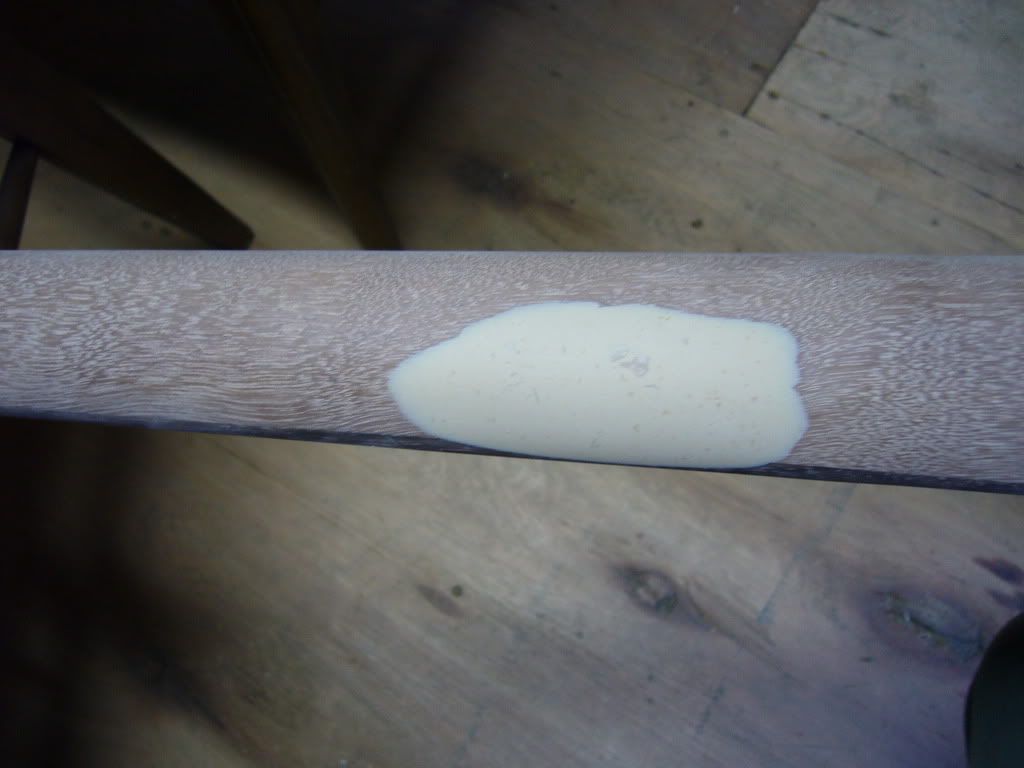
Ok, so this is when things started to get a little squirrelly for me. I sanded the poly off of the neck and I got a little carried away. I ran into two problems. The first problem: I kind of sanded a little ripple in the back of the neck around the 10th-11th fret. It wasn't too bad but I felt that every time I tried to sand it to even it out I was taking a little bit more off the neck and that started to worry me. I figured I had 2 options, one, just leave it since it wasn't that bad and maybe not noticeable (unless I pointed it out) but at the end of the day I would notice it and I knew it would bother me forever so I decided to go with option 2. Option 2: I decided to rub a really thin coat of quickwood over the area and to sand it flat. After going to about 3 stores I still couldn't find the correct color but I knew I was painting it black anyway so I just used whatever color they had. I applied it and sanded it. I'm very happy with the results. It might not look pretty when looking at the unfinished neck but once I painted it you would never know. It looks and feels perfect so I'm glad I didn't just leave it. Here's a picture of it. Again, I know the off color makes it an eyesore but you can't see it now so I'm fine with it.


The second problem: In general I took a little more off of the neck than I would have liked. I didn't think that was the case until my bandmate got a new Gibson Custom Shop NR Firebird. The neck on his was a huge baseball bat compared to my bass. I didn't remember if mine was like that when I got it because it had been so long and I barely played it before I started stripping it. At this point I was totally convinced that I took way too much off of the neck and that I had ruined it which lead to me putting it aside for months. I was pretty bummed. Especially since the necks on those basses are already so thin. I kind of figured it was f***ed. I painted it and stuff but it sat around unassembled for a long time before I revisited it. I eventually took it to John Karras, known on this board as John_K and I compared it to his original Bachbird. I came to find out that, although mine was a little thiner than his it was much closer than I thought. Thank God. His neck was also very thin and he convinced me that mine was totally fine. He also reminded me that the Bachbird's were finished in a thick poly and mine was a thin nitro which was also something to consider. I really thought mine was a goner before I compared the two basses. Anyway, as I stated earlier, he helped a great deal with mine but again, I'll get more into that later.

Dave W

  • Administrator
  • *****
  • Posts: 22246
  • Got time to breathe, got time for music
    • View Profile
Re: My Bachbird Project.... FINALLY!!!
« Reply #28 on: July 29, 2011, 09:20:11 PM »
You didn't sand through to the truss rod, so if it isn't that much thinner than John's, probably no need to worry about anything happening later on.

drbassman

  • Moderator
  • *****
  • Posts: 6699
  • Gone but not forgotten
    • View Profile
Re: My Bachbird Project.... FINALLY!!!
« Reply #29 on: July 30, 2011, 03:44:53 AM »
I did the exact same thing on one of the first basses I stripped.  I used a similar fix and it worked out fine.  Good recovery.
I'm fixin' a hole where the rain gets in..........cuz I'm built for a kilt!